ATTENTION users of older versions of InvTool!: Please see below before beginning.
Now you’re ready to begin using InvTool. First, you need to create a personal inventory file. Each person who uses InvTool needs to create their own inventory file, so that the program does not get the users’ recordings mixed up.
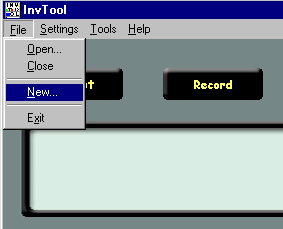
In the menu bar at the top of the interface, click "File", then "New…", as shown below:
This will bring up the "Create New Inventory" dialog box:
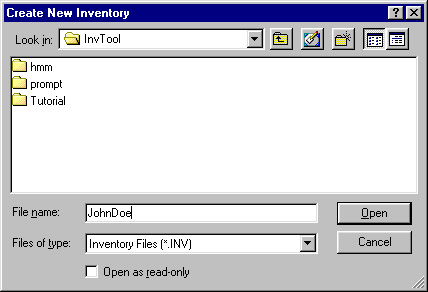
In the box labelled "File name:", type in the name of your inventory, as shown in the picture above. The name you enter can be anything you'd like (such as your first name) with the one restriction that we recommend you avoid having any space characters in the name (e.g., "MyVoice", not "My Voice"). When you have entered the name, click "OK". The most recent versions of InvTool will then display a second file selection dialog and ask you to select an inventory template to use in creating the new inventory file. Unless you have created your own inventory templates, the only file you should see is the file called "Default.int". Select that file and click "OK". (Note that the option to select an inventory template is present in InvTool version 3.2.11 and more recent versions.)
You have now created an inventory file, which is simply a text file that lists all of the sentences you will record, and whether or not you have recorded them yet. The inventory file will have the extension ".inv", such as "JohnDoe.inv". This command also creates a new directory which will store all of your actual recordings. The name of this directory will be the name of your inventory plus "_wav", such as "JohnDoe_wav".
NOTE to users of older versions of InvTool:
Versions of InvTool made available before March 4, 2002, do not use named inventory files and speech directories. If you have already started recording a speech inventory with a version of InvTool downloaded before 3/4/2002, you need to make a couple of changes to your existing directories to make them compatible with the newer version, before starting the newer version for the first time:
Go into your InvTool home directory (which should be located in C:\Program Files\SRL\InvTool). Rename the inventory file "newfull.inv" to <NAME>.inv, and rename the waveform directory "wav" to <NAME>_wav. For example, if you wish to create a synthetic voice called "JaneDoe", you should rename "newfull.inv" to "JaneDoe.inv" and rename the "wav" directory to "JaneDoe_wav". After these changes, you can start the new version of InvTool, select File->Open (see "Re-Starting"), and open the file "JaneDoe.inv" to continue working on your voice database recording.