
WHAT IS LabVIEW?
LabVIEW is a program development application that uses a graphical programing language instead of text. This approach is more modular and may be easier to learn for those unfamiliar with text programming.
WHAT IS A VI:
The basis of LabVIEW is the Virtual Instrument (VI). The VI's have both an interactive user interface and a source code equivalent, and accept parameters from higher level VI's. The interactive user interface is the FRONT PANEL, the source code equivalent is the BLOCK DIAGRAM, and the parameters are simple VI's such as the sine and cosine functions as used in the following example. LabVIEW has a number of VI's in its library or you can create your own to minimize the cluttered look of the program.
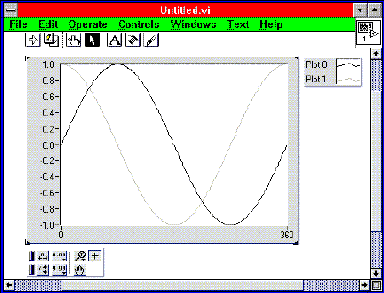
FRONT PANEL:
The front panel is the display panel. As can be seen in this diagram, I have put one graph. Other items that can be located on the front panel are booleans to stop a program, arrays to display calculated numbers, knobs to adjust input numbers, and many others.
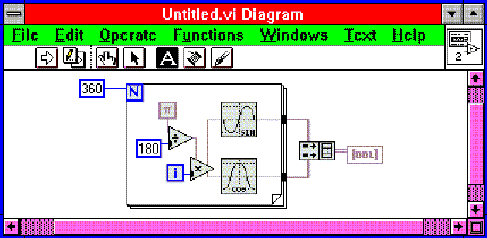
BLOCK DIAGRAM:
The back panel consists of your source code equivalent. In this particular example, I used a for loop that ran for 360 increments. Because sin and cos both require radians, a simple multiplication was performed. As you may or may not notice, the wire connections do not all look the same. The thin lines contain single elements, the thick lines contain a single array, and the double line contains a 2-D array. When you work on the computer, you will notice that the wires are also different colors. Briefly, the strings are pink, booleans are green, integers are blue, and doubles are orange just to name a few.
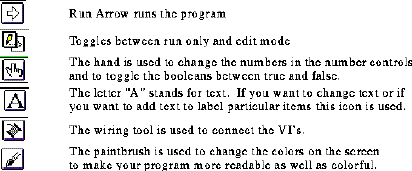
WHAT ARE THOSE BUTTONS AT THE TOP ?
GETTING STARTED:
1.Double Click on the LabVIEW icon. This will bring up the front panel.
2.Then look at each of the pulldown columns located at the top of the screen.
File: Basic Open, Close, Save
Edit: Copy, Paste, Alignment of objects on page, Remove Bad Wires(Ctrl+B)
Operate: Run(also done with arrow), Change to/from Run/Edit(also done with button)
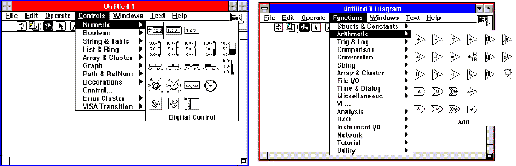
Controls: This is where you find the library of VI's
Windows: Show Diagram(Ctrl+F)
Text: change fonts, size, style...
Help: Self Explanatory
3.Now try some simple addition and subtraction using the VI's:
1. First go to the front panel and select Controls ` Numeric ` Digital Control
Label this control "x" so you can identify it on the block diagram.
(This will bring up a control to input numbers into to perform your addition.)
2. Repeat this step labeling the second one "y".
3. Then select Controls ` Numeric ` Digital Indicator
Label this indicator "x+y" so you can identify it on the block diagram.
(This will bring up a control to show the results of the addition.)
4. Now switch to the Block Diagram Panel and identify the pieces you have just created. Put "x" and "y" on the left and "x+y" on the right.
5. Bring up the help menu (OpenApple+h).
6. Select Functions ` Arithmetic ` Add
7. Select the wiring tool and connect while viewing the help menu to see that you are at the right point of the addition. (This may seem trivial now, but when you are wiring icons with 10 inputs it becomes a necessity.)
8. Check to see if the Run Arrow is broken. If is not broken, you can put numbers into the controls and add numbers. If it is broken, press it anyway and the error window will pop up and show you where your errors are.
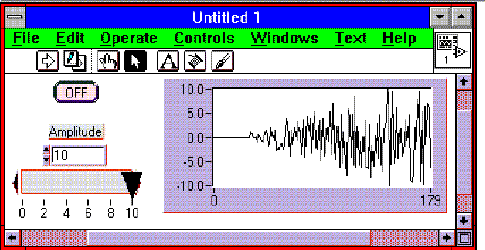
LOOPS AND CHARTS:
In this next example a number of things are demonstrated. First of all, as the title suggests, the while loop is shown. In the demonstration below I have used a while loop. The while loop executes a set of commands until the condition wired into the arrow symbol is false. In the condition below, the condition is a button that is labeled on(true) or off(false).
The other type of loop is the for loop structure. In this type of loop, the set of commands is executed a specified number of times just as in other programming languages. In the for loop, there is a small box marked N in the top left corner into which the specified number of iteration desired is to be wired.
Next, the boolean switch is used. Here, a basic oval switch is used, but there are many shapes and sizes that can be chosen. You will notice, when the switch is chosen, the block diagram shows the boolean switch as a green block. This should be wired to the conditional terminal. After the switch has been chosen, there are a number of mechanical actions that the switch can display. The default is latching in both directions. To look at the other options, use OpenApple+MouseClick while over the switch.
Next, a numeric slide was chosen to give the generated signal a variable amplitude. In this case it is a control, but it can also be used as an indicator. There are many different types of numerics from slides to knobs to dials.
Finally, a Waveform chart was chosen to display the generated signal. There is 1 type of chart with 3 modes and 3 types of graphs. A chart is used to display the numbers as they appear and a graph plots a block of information at a time. They each take a different format (array or cluster) of numbers. Refer to the help pop up menu for more information. ,
Controls ` Boolean ` Any
Controls ` Numeric ` Slide
Controls ` Graph ` Waveform Chart
For the block diagram, the Boolean, the graph, and the slide have already appeared on the block diagram. Next, the while loop should be brought up and made big enough to fit everything else. You will see the conditional terminal in which to wire the boolean. Follow the directions below and wire them together as shown.
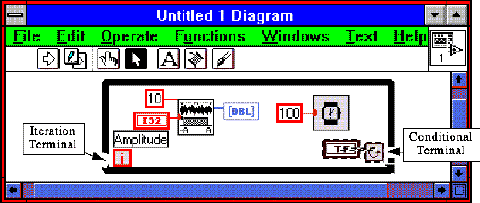
Functions ` Structs & Constants ` While Loop
Functions ` Structs & Constants ` Numeric Constant (2 of these, one is 10, the other 100)
Functions ` Time & Dialog ` Wait(ms)
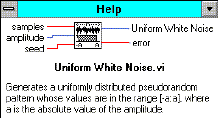
Functions ` Analysis ` Signal Generation ` Uniform White Noise
This is a basic help menu. It gives the basic description of what the VI does and what needs to be plugged into it. Usually, the menu also lists the defaults for the settings if they are unwired. Also, all of the items that must be wired are in bold letters. For this example, double click on the Uniform White Noise VI to see how it is created and what the defaults are.
CREATING subVI'S:
A sub VI is similar to a subroutine in C. You can create an infinite number of subVI'S to include in your main program. SubVI's can appear within subVI's. You can also run the subVI's independently to test and debug. To keep this simple, we will use the program we just created:
1.Go to the front panel.
2.Move your cursor over the icon that is located in the upper right of the window.
3.Hold the OpenApple key and click the mouse button to get the pull down menu
4.Select Show Connector. If the connector that is automatically chosen is the best for what you need, go to step 5. If not, choose OpenApple+mouse click and select pattern and find the one that best fits your application.
5.After you have the appropriate connector, the wire wrap tool will automatically appear. click the connector in one of the blocks and then click on the corresponding piece on the front panel. Repeat this for the remaining pieces.
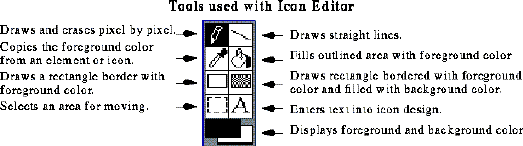
6.Go back to the icon display (OpenApple+mouse on the connector) and then choose Edit Icon. It will look like this:
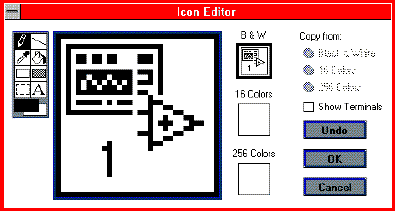
7.Choose on the box under either 16 Colors or 256 Colors and use the tools described below to edit the icon. When you are finished, click ok and then put your cursor over the new icon and look at the help menu.
SHIFT REGISTERS, SEQUENCE STRUCTURES, ARRAYS,
CASE STRUCTURES, AND FILE I/O:
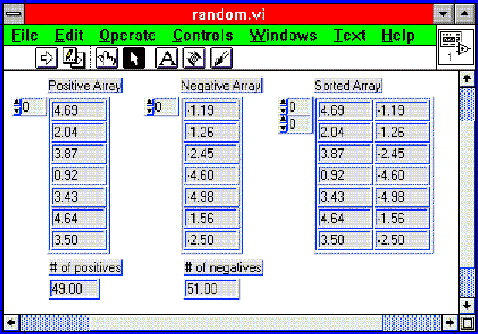
In this next section and number of different concepts are discussed and demonstrated in the program below. The basic overview of this example is that 100 numbers between +10 and -10 are randomly generated, sorted into positive and negative numbers, and then printed to a file. The front panel shows the positive numbers, negative numbers, the array of sorted numbers, and how many of each positive and negative numbers are there.
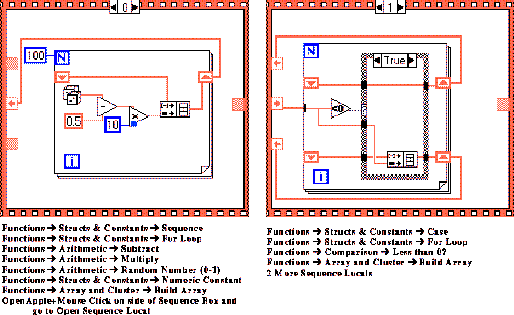
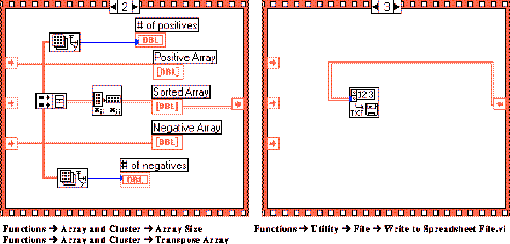
The next 4 images show the block diagram of this process. For this block diagram I cut out the top part of the window and only included what was in the window itself. If you look at the block diagram, it appears to have a "track" on the top and bottom. This vi is called a Sequence. It look like a roll of film and works in a similar manner. The program runs the [0] frame first. When it is completely finished, it moves to [1], [2], and then [3]. To pass numbers between frames, LabVIEW has pieces that are called sequence locals. If you look at the [0] frame, one sequence local has and arrow pointing out indicating that it is taking information from this screen, and the other three or shaded indicating that they are empty at this point.
STRINGS AND SIMPLE DATA AQUISITION:
There are many different options for Data Acquisition all located in Functions ` DAQ. The ones that I am most familiar with are the Analog Input and Analog Output. Within these categories, the main differences are whether you read in one piece of data at a time or a specified amount of samples. Just look at the help menu to find out their capabilities according to your requirements.
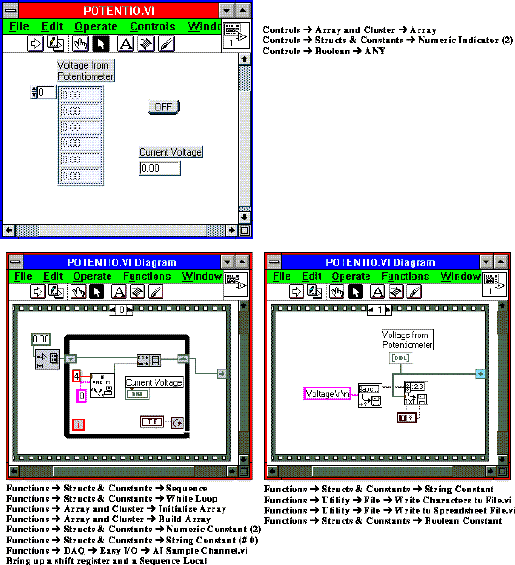
Just a couple of notes about the board:
The row on the right is all Analog inputs and grounds.
DAC0OUT and DAC1OUT is Analog outputs.
The PA items are all digital. Please refer to the manual for maximums for Voltage and Amperage.
SOME SHORT CUTS USING KEY COMMANDS:
OpenApple+bRemoves all of the bad wires
OpenApple+fToggles between the front panel and the block diagram
OpenApple+hBrings up the help menu
SPACEBARToggles between hand and arrow on FRONT PANEL
Toggles between wire tool and arrow on BLOCK DIAGRAM
TAB KEYToggles between all of the tools for whichever panel is being edited
OpenApple+MouseClickBrings up the controls menu if you are in the front panel or the functions menu if you are in the block diagram. This combination will also bring up a pull down menu for many of the VI's.
THIS BRIEF MANUAL IS AN INTRODUCTION TO THE BASICS OF LABVIEW. PLEASE REFER TO THE TUTORIAL FOR A MORE COMPLETE INTRODUCTION.
![]()
![]()
![]()
Last updated: December 18, 1996 by Zunaid Kazi <kazi@asel.udel.edu>